
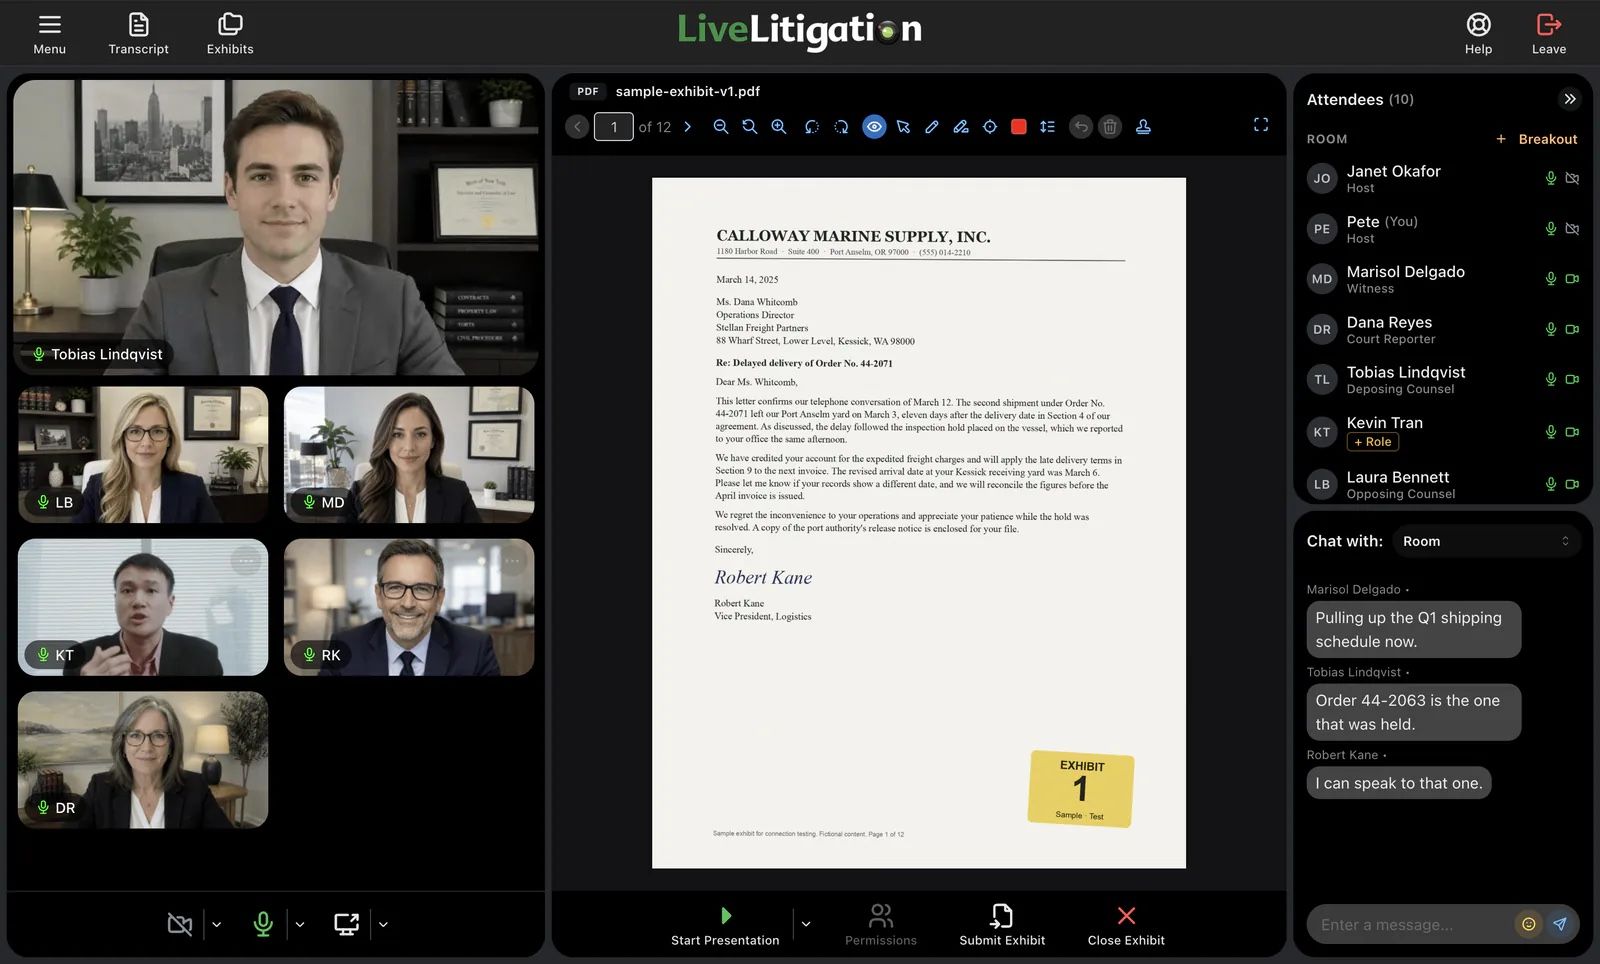
Exhibits are where remote depositions slow down. Someone emails a stack of PDFs the night before. The questioning attorney shares a screen the witness can barely read. Opposing counsel asks which version is on screen, the court reporter keeps a list of exhibit numbers by hand, and afterward nobody is quite sure which marked-up copy belongs with the transcript.
Electronic exhibits fix this, as long as the exhibits live inside the deposition itself. In LiveLitigation, exhibits sit in the same room as the video and the realtime transcript. Everyone sees the same document on the same page, the witness can mark it up when you allow it, and a stamped, numbered copy is saved for the record the moment you submit it.
This guide walks through that workflow step by step, with screenshots from the LiveLitigation deposition room. If you are new to remote depositions, start with our complete guide to remote depositions.
Why Screen Sharing Is Not an Exhibit Workflow
Screen sharing was the first answer to remote exhibits, and it still works in a pinch. But it was built for slides, not for the record.
- The witness sees a video of your screen, not the document. They cannot zoom in on fine print or look back at an earlier page on their own.
- Depending on what you share, notifications, other files, or the next exhibit you have not introduced yet can end up on screen.
- Nobody else can mark the document, so "circle the signature" becomes a verbal description in the transcript.
- There is no stamped copy at the end. Exhibit numbers live on someone's notepad until they are matched up after the fact.
Purpose-built electronic exhibit software treats each exhibit as a document the whole room can see, mark, and preserve. For the bigger picture of how firms organize exhibits across a case, see our article on digital exhibit management.
Step 1: Upload and Organize Exhibits Before the Deposition
Upload exhibits ahead of time so you are not hunting for files on the record. In the room, click Exhibits at the top left of the room header to open Manage Exhibits. Click Upload, or drag files anywhere onto the window.
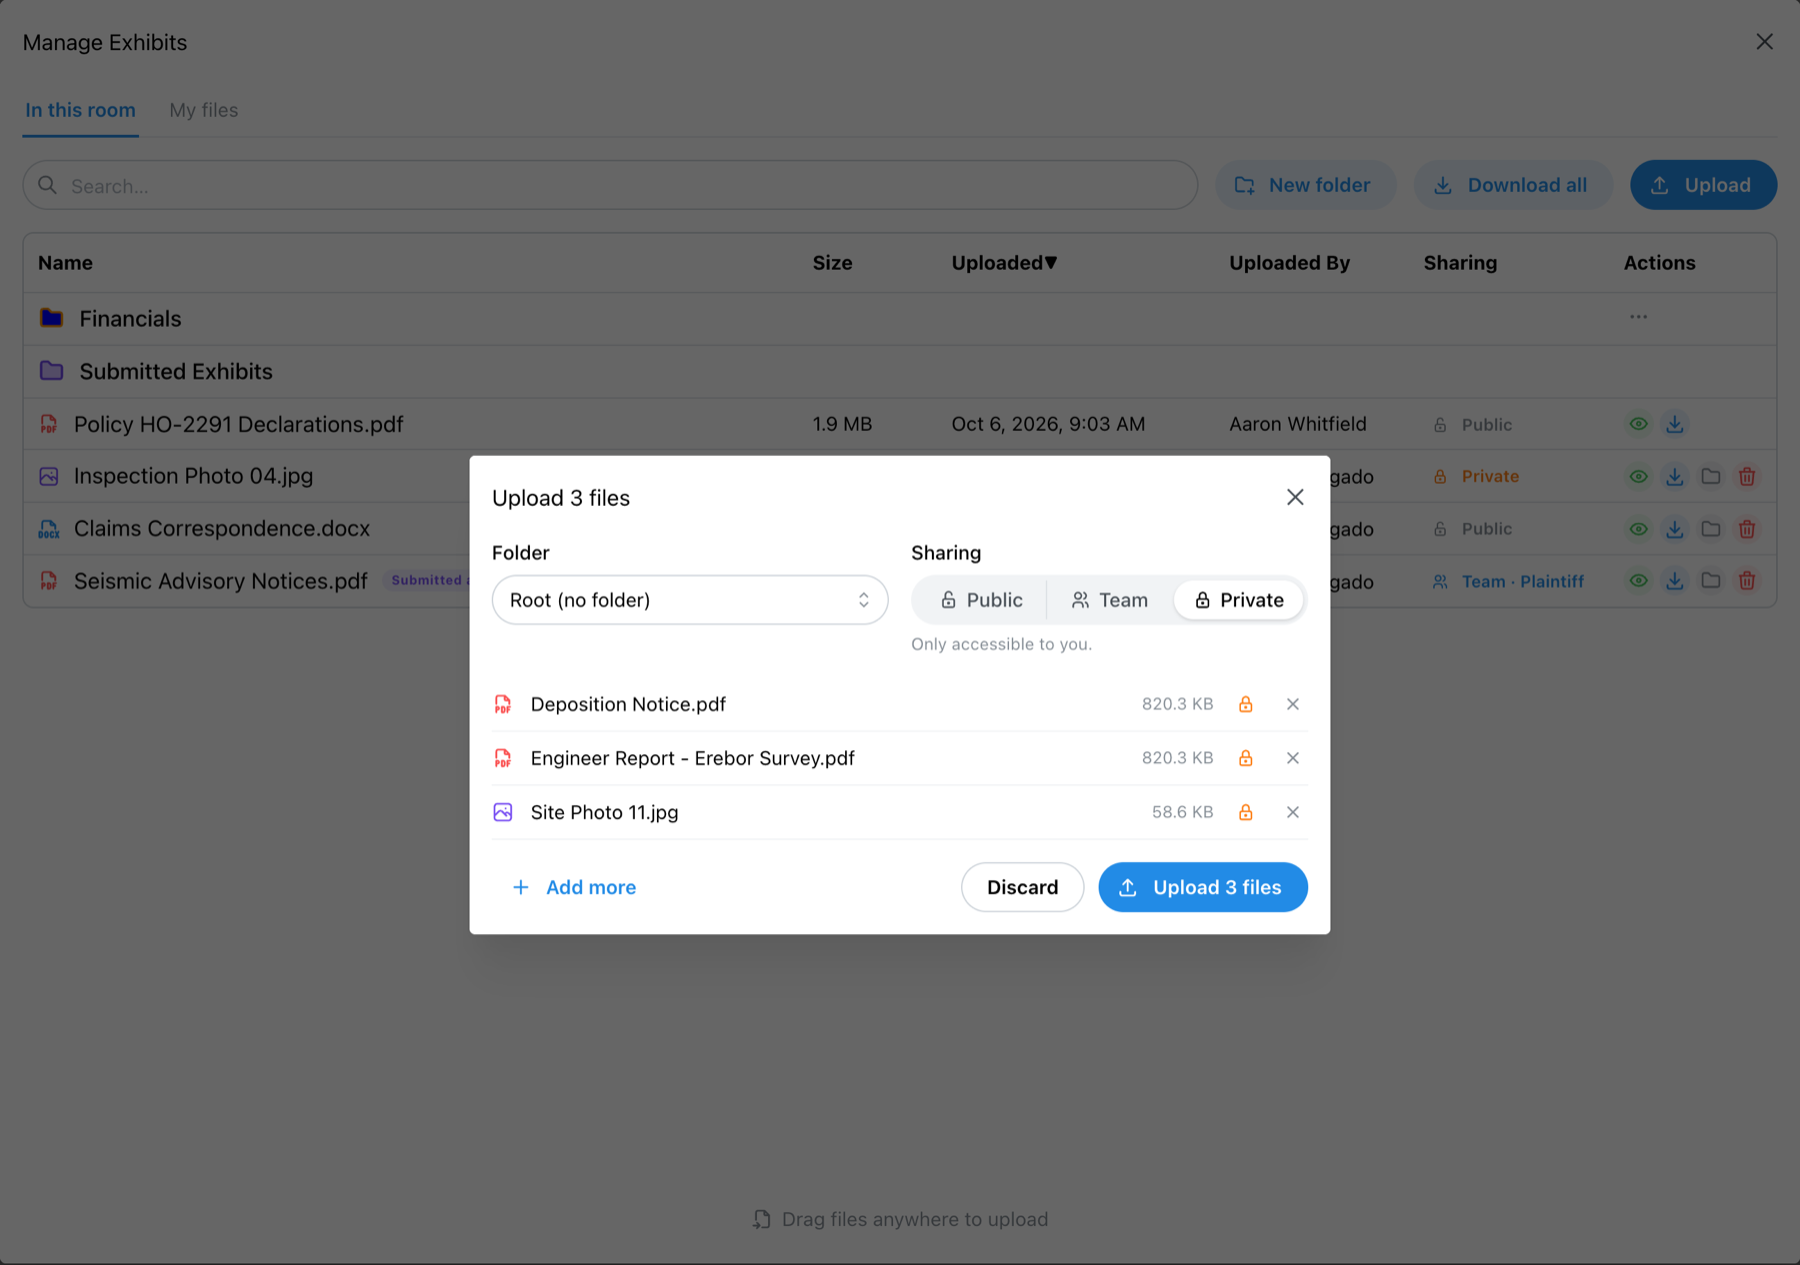
The upload window sets up a whole batch at once:
- Folder: group exhibits by topic, witness, or party.
- Sharing: choose Private, Team, or Public for the batch before anything uploads.
- Add more or remove a file before you click Upload.
LiveLitigation accepts PDFs, images, Word, PowerPoint and Excel documents, CSV and text files, and video and audio files as exhibits. Files you have uploaded before are under My files, so a document from an earlier deposition can be added to this room without uploading it again.
One practical tip: if a PDF or Office file needs a password to open, remove the password and save a copy before you upload. LiveLitigation flags locked files at upload, because nobody else in the room could open them.
Step 2: Decide Who Can See Each Exhibit
Not every exhibit should be visible the moment it is uploaded. Every exhibit in LiveLitigation has one of three sharing levels, and you can change it at any time.
- Private: only you can see it. Use this for exhibits you have not introduced yet.
- Team: visible to your team, such as co-counsel on the plaintiff side, when the host has put you on a team.
- Public: visible to everyone in the room.
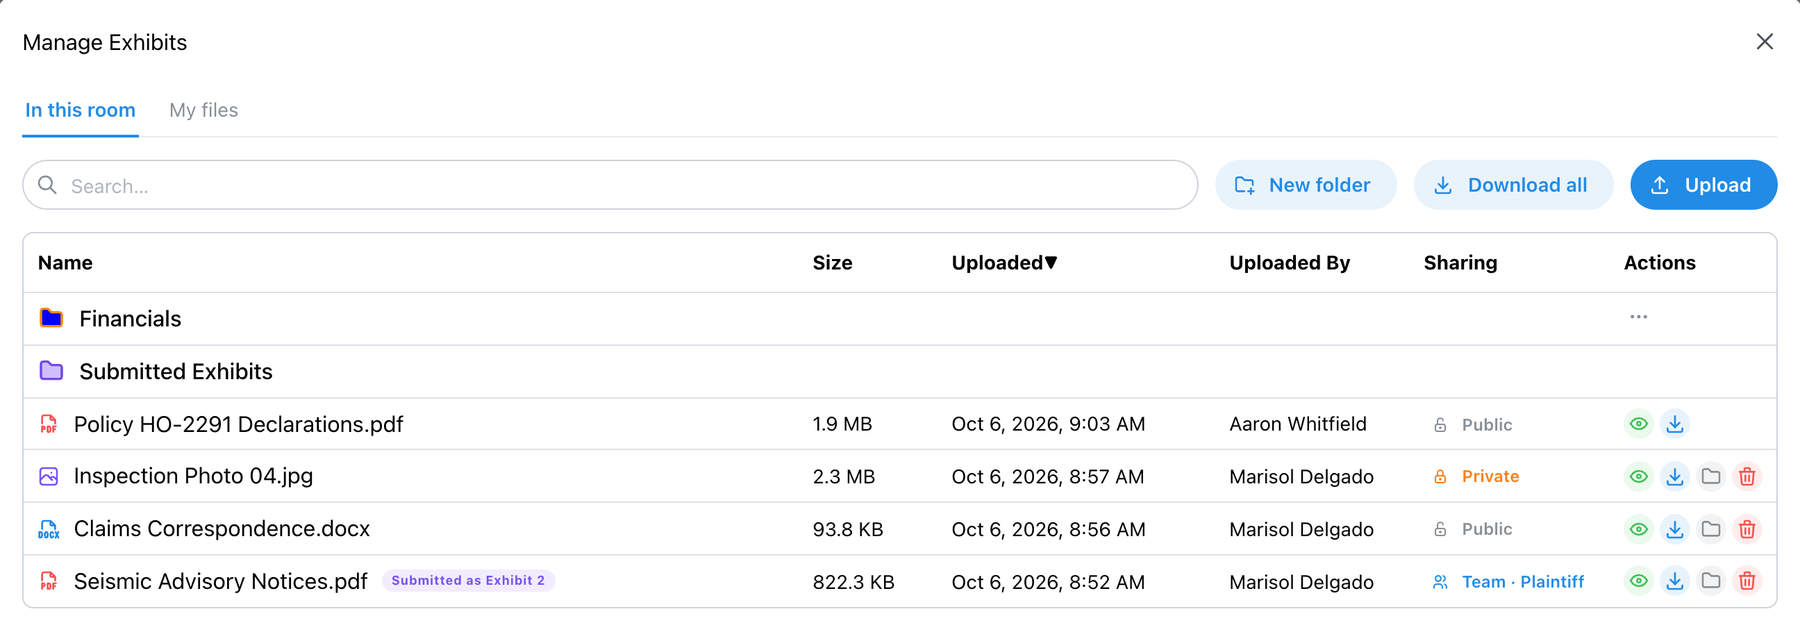
The exhibit list shows each file's sharing level, who uploaded it, and whether it already has saved markup. Search, folders, and Download all (one zip file) keep a long exhibit list manageable.
Presenting an exhibit shares it with the room automatically, so it appears in everyone's exhibit list, not just the list of the person who uploaded it. The owner can set it back to private afterward if needed.
Step 3: Present the Exhibit So Everyone Sees the Same Page
Click an exhibit to open it, then click Start Presentation. The exhibit opens in the main viewing area for everyone in the room, next to the video and the realtime transcript.
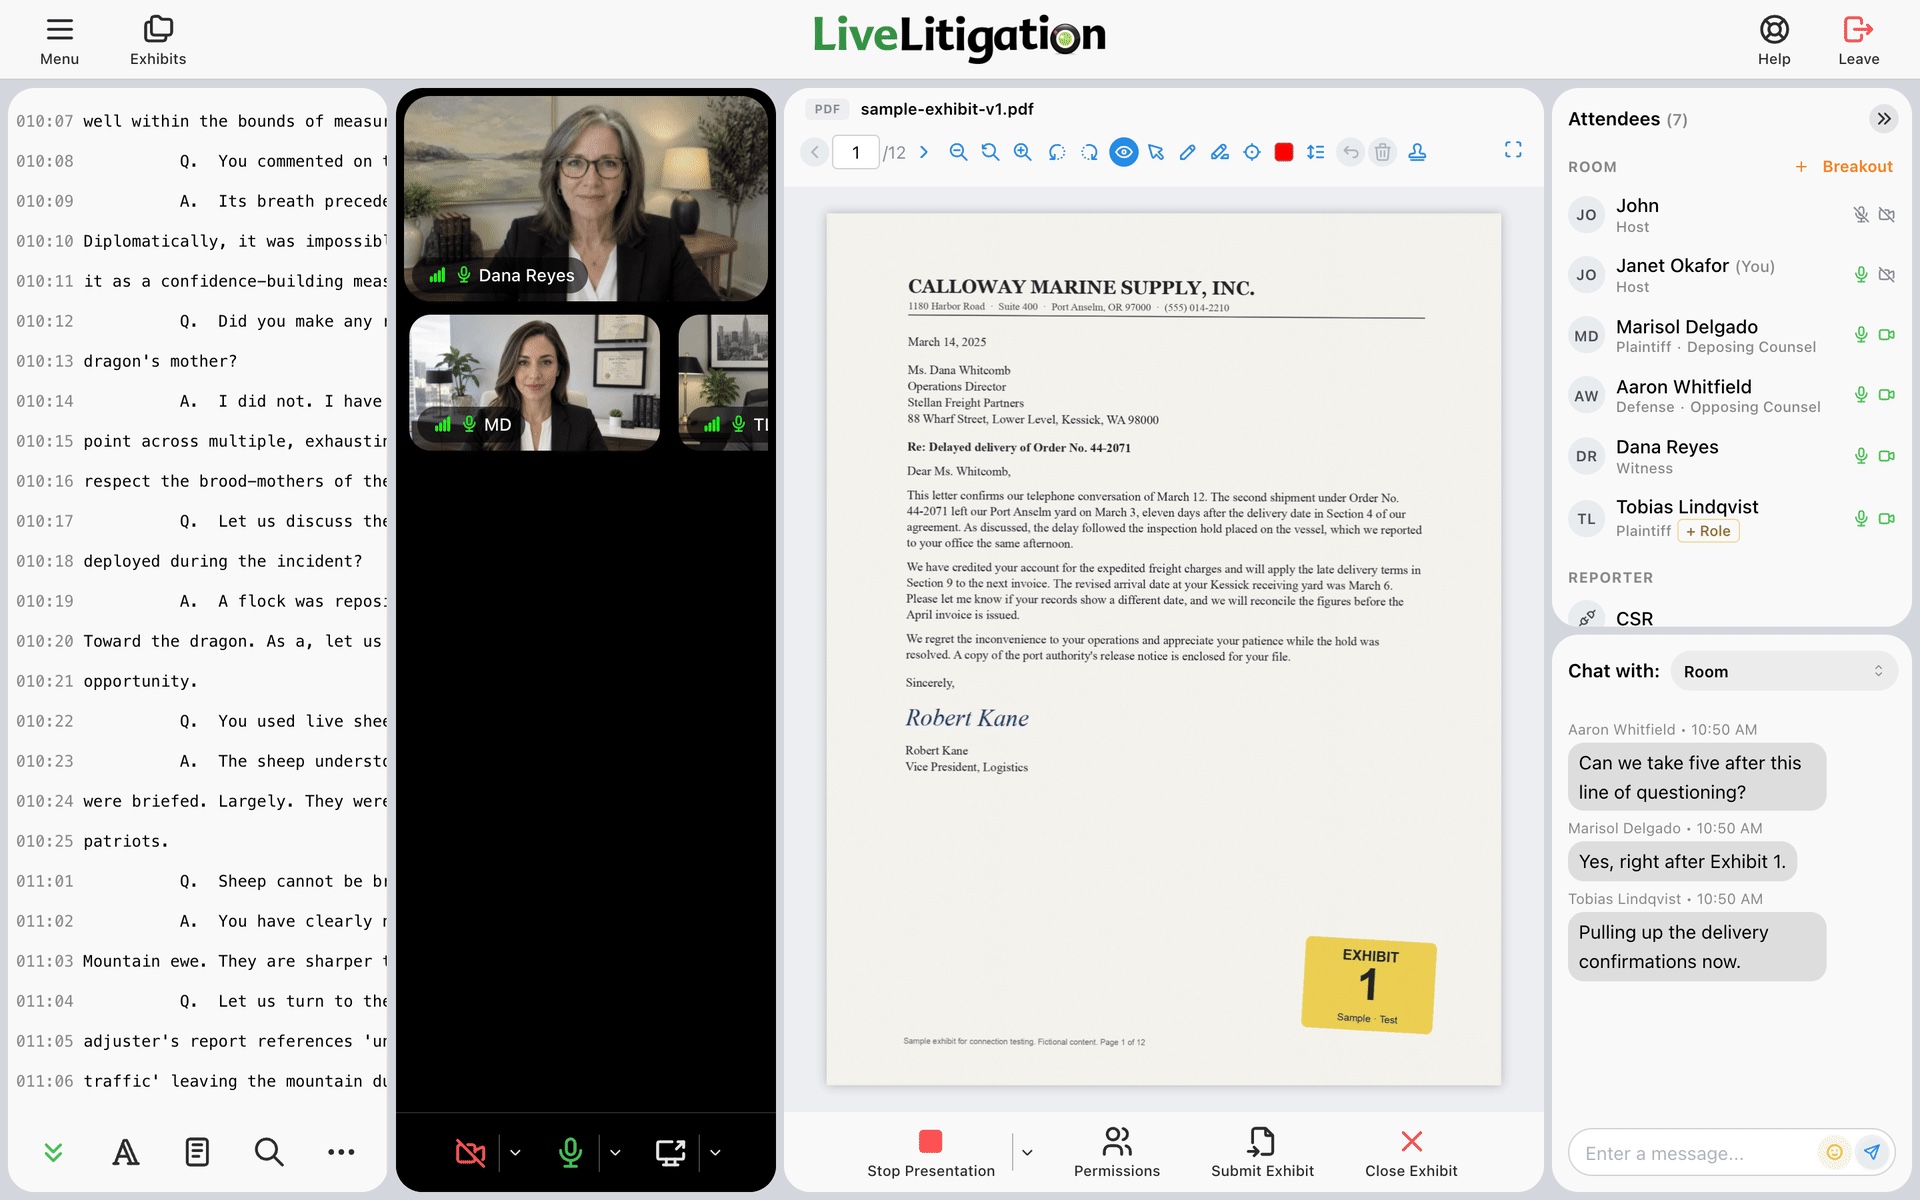
While you present, you lead and the room follows: when you turn the page, everyone's view turns with you, and other attendees see who is presenting at the bottom of the exhibit. A few viewer tools are especially useful on the record:
- Focus on selection zooms to the passage you marked, which helps when you are questioning on a single clause.
- Rotate left and Rotate right fix a page that was scanned sideways.
- Fullscreen gives the document the whole window.
Click Stop Presentation when you are done with the exhibit.
Step 4: Stamp the Exhibit
Exhibit stickers do not travel well over video. LiveLitigation replaces them with an electronic exhibit stamp placed directly on the document. Click Add Exhibit Stamp in the markup toolbar to open Create Exhibit Stamp.
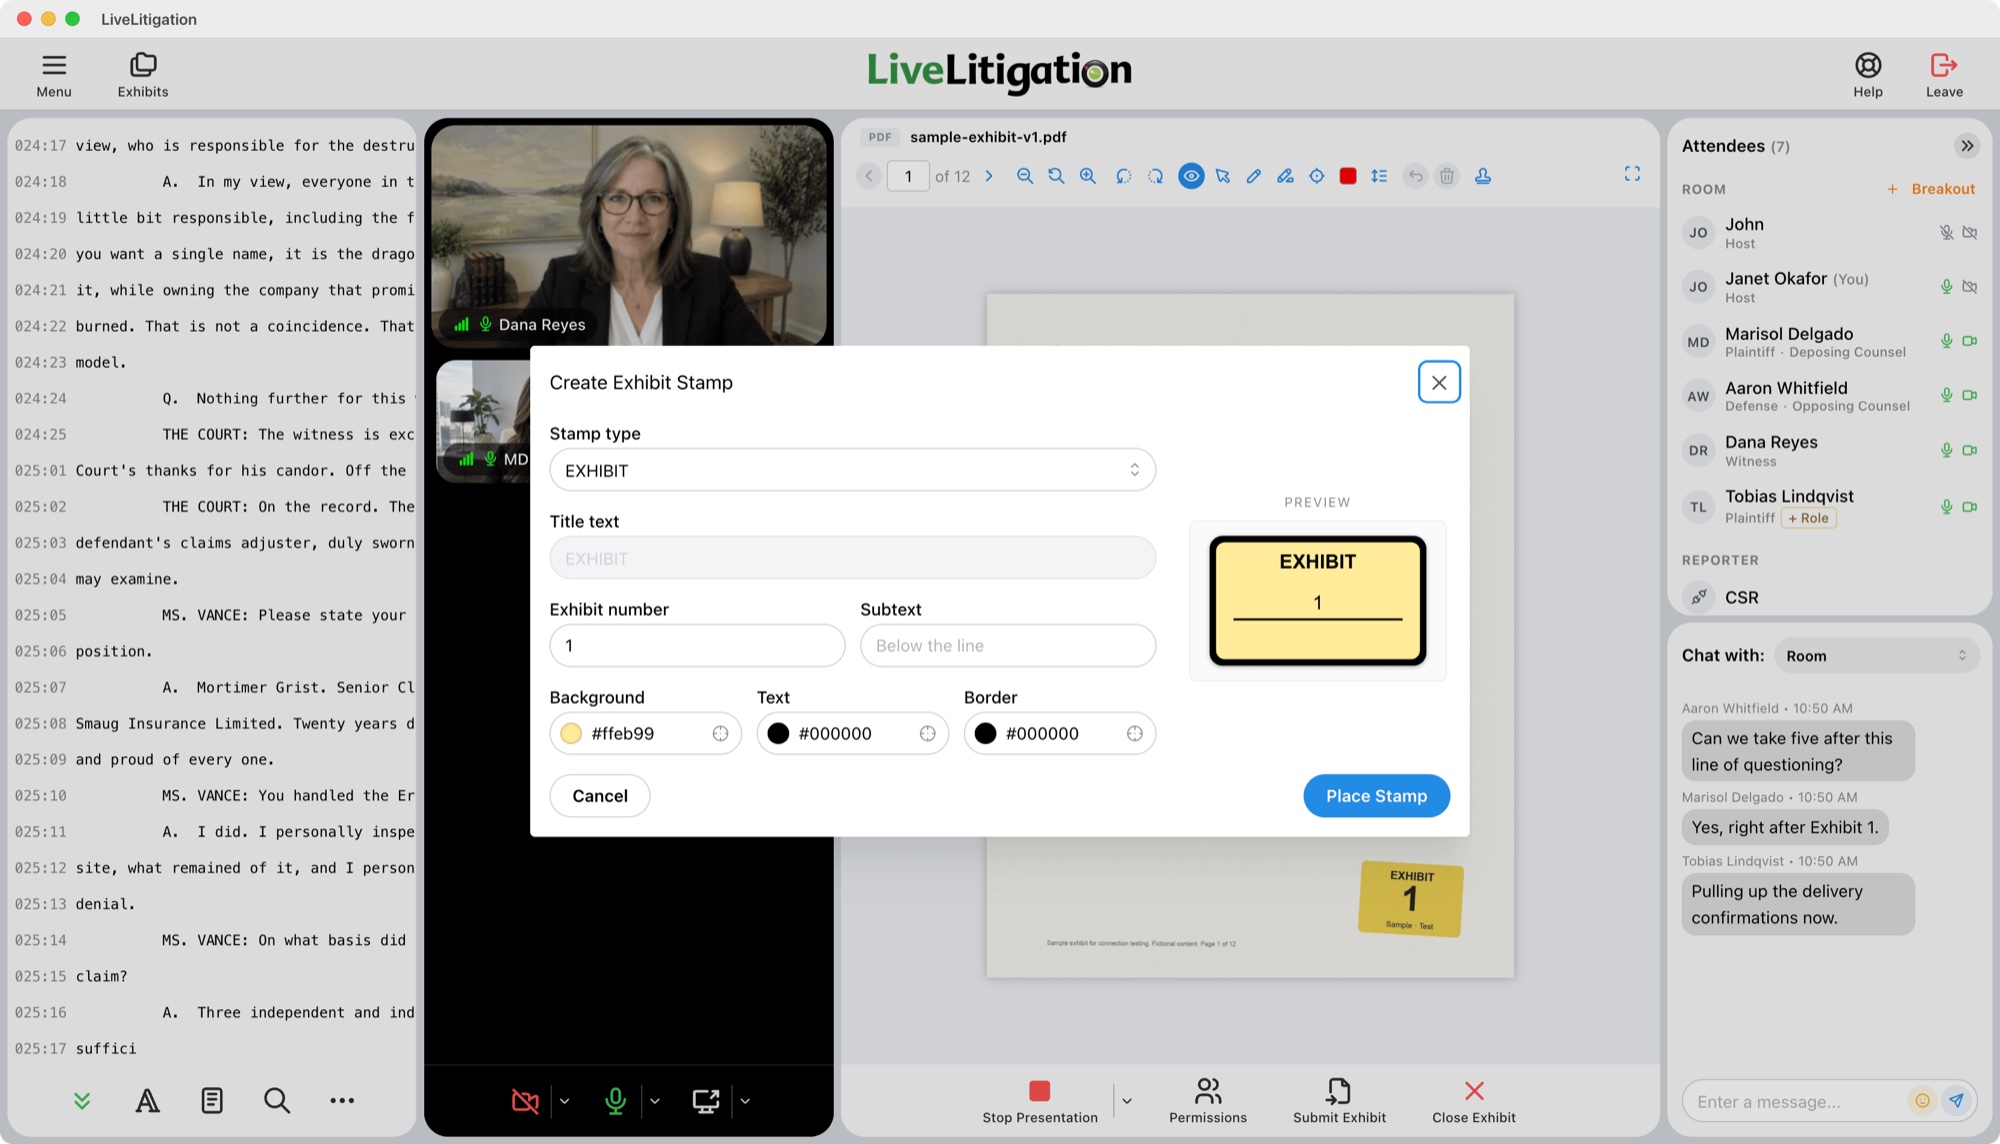
- Stamp type: EXHIBIT, PLAINTIFF'S EXHIBIT, DEFENDANT'S EXHIBIT, PETITIONER'S EXHIBIT, RESPONDENT'S EXHIBIT, or a custom title.
- Exhibit number, plus an optional line of subtext below it.
- Background, text, and border colors, with a live preview.
Click Place Stamp, then drag and resize the stamp so it does not cover anything important on the page.
Step 5: Let the Witness Mark Up the Exhibit
Some of the most useful testimony comes from asking a witness to point at something. In LiveLitigation, the presenter decides who can draw. Click Permissions to give temporary markup permission to anyone in the room, including the witness.
The markup toolbar includes:
- Freehand draw, to circle a signature or underline a date.
- Highlight box, to drop a translucent box over a passage.
- Stroke color and thickness, so different marks are easy to tell apart.
- Select / Move, Undo last stroke, and Clear annotations on this page.
Everyone sees each mark as it is drawn, and the marks are carried into the submitted copy in the next step. Attendees without permission see the markup in View only mode. The toolbar always shows the same tools, so a greyed-out tool simply means it is not available to you right now.
It is worth rehearsing this with your witness before the deposition. Our guide to preparing a witness for a remote deposition covers the rest of that conversation.
Step 6: Submit the Stamped Exhibit for the Record
When the exhibit is stamped and marked, click Submit Exhibit and confirm the exhibit number.
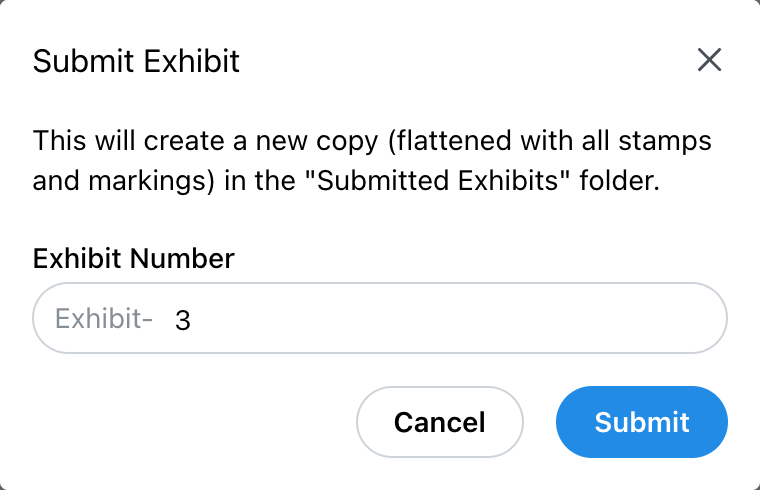
LiveLitigation creates a new copy of the document, flattened with every stamp and marking, and saves it in the Submitted Exhibits folder. The original file is never changed, and the exhibit list labels it with the number it was submitted as, such as "Submitted as Exhibit 2."
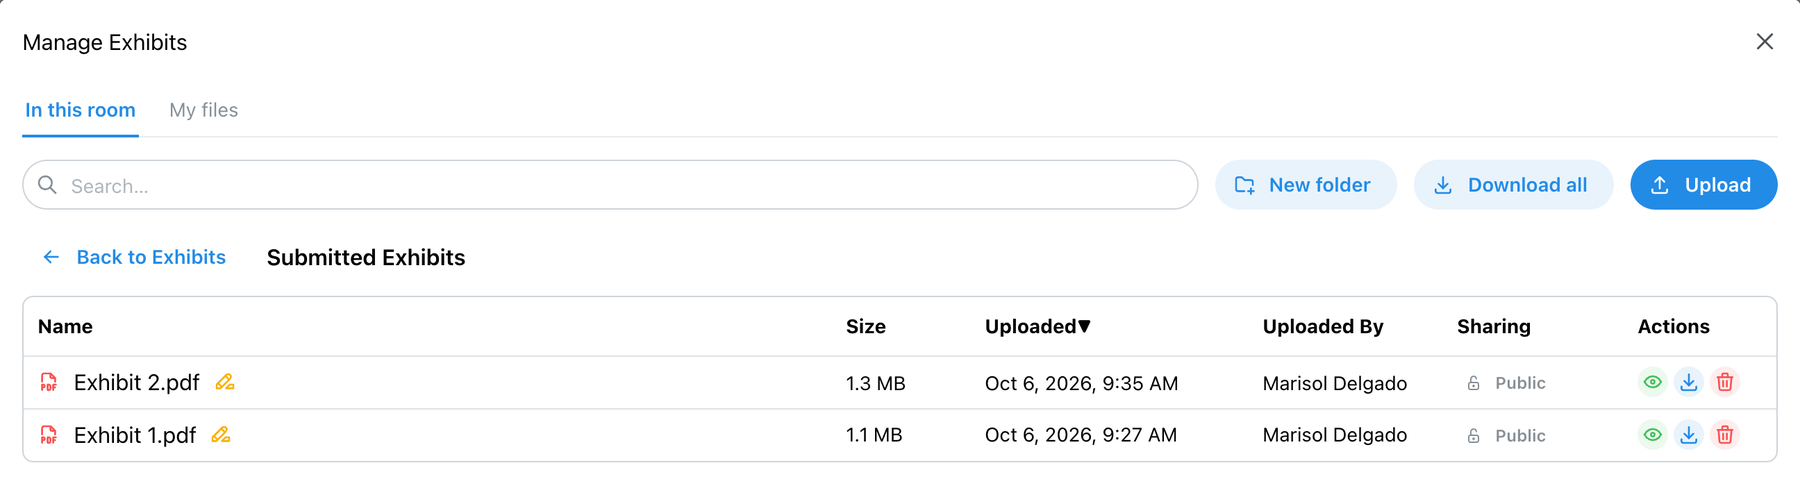
Because the submitted copy is flattened, the stamp and the witness's marks are part of the page itself. What the court reporter and counsel download is the marked version the room saw, not a clean original.
After the Deposition: Getting Exhibits to the Court Reporter and Counsel
Exhibits stay with the room after the session ends. From Manage Exhibits you can download a single exhibit, or use Download all to take every exhibit away as one zip file. After the session, the room's exhibits are also available from the Exhibits tab on your LiveLitigation dashboard.
If your firm uses Clio, submitted exhibits can be sent to a linked Clio matter, so they land with the rest of the case file.
What's New in LiveLitigation Exhibits
We have made several recent improvements to how exhibits work in the deposition room:
- A redesigned Manage Exhibits window, with In this room and My files tabs, folders, search, and Download all.
- Folder and sharing are set for a whole batch in the upload window, before anything uploads.
- Each original shows the exhibit number it was submitted as.
- Presented exhibits are shared with the room automatically, so they appear in everyone's exhibit list.
- PDFs that carry only editing restrictions, common on insurance and bank documents, can now be stamped and submitted. Files that need a password to open are caught at upload with a clear message instead of failing later.
Remote Deposition Exhibit Checklist
Before the deposition
- Upload exhibits the day before and sort them into folders.
- Keep exhibits Private until you introduce them, and share working documents with your Team.
- Remove passwords from any locked files.
- Rehearse marking an exhibit with your witness.
During the deposition
- Present exhibits instead of sharing your screen.
- Stamp each exhibit as you introduce it.
- Give the witness markup permission when you want them to draw.
- Submit each exhibit once it is stamped and marked.
After the deposition
- Check that every exhibit is in Submitted Exhibits.
- Download everything as one zip, or send submitted exhibits to Clio.
Frequently Asked Questions
Can you introduce exhibits in a remote deposition?
Yes. Exhibits are introduced much as they are in person: identified, marked, shown to the witness, and made part of the record. On an online deposition platform like LiveLitigation, the exhibit is presented to everyone in the room, stamped electronically, and saved as a submitted copy.
How do you mark an exhibit electronically?
Open the exhibit, click Add Exhibit Stamp, set the stamp type and exhibit number, and place the stamp on the page. Submitting the exhibit saves a flattened copy with the stamp in place.
Can the witness annotate an exhibit remotely?
Yes. The presenter can give the witness temporary markup permission. The witness's marks appear for everyone as they are drawn and are included in the submitted copy.
What file types can be used as exhibits?
PDFs, images, Word, PowerPoint and Excel documents, CSV and text files, and video and audio files.
Does submitting an exhibit change the original file?
No. Submitting creates a new, flattened copy in the Submitted Exhibits folder. The original stays exactly as it was uploaded.
Can other attendees see my exhibits before I present them?
Not if they are Private. Private exhibits are visible only to you, Team exhibits to your team, and Public exhibits to the whole room. Presenting an exhibit makes it public in the room.
LiveLitigation brings video, the realtime transcript, and electronic exhibits together in one secure deposition room. See every exhibit feature on our Exhibits page, follow the step-by-step Exhibits guide, or request a demo to walk through the workflow with your own documents.